Another superb game down at Ian's on Good Friday. He has the knack of putting on a great battle (the background research, the set-up and - of course - the chocolate cookies) and Friday was no exception.
After the usual chat and banter it was down to business. Wanting to win, I sneaked over to Ian's side of the table (Ian being a POW demi-god) only to find I was actually on the wrong side of the table. It's never dignified to crawl under a table and pop up on the other side, but I think I managed to carry it off.
"So you're going on the British side?"
"No - I'm going on the winning side".
So Ian and me vs. Mark and Russ. We had the British East India Company (with sepoys and native horse contingent) and they were the French East India Company (with their own sepoys and native allies).
We also talked about casualty markers - units on 1p pieces that will mark the progress of the battle. This might work but where static lines converge it might get a bit cluttered.
Mark and Russ went over their army list...
Mark - "Give us the army list..."
Russ - "I'll let Mark take over - again".
Mark (looking at the army list) - "What is I, S, H"
Me - "Almost shit, but not quite"
Mark "This artillery might as well be a monkey with a slingshot!
Then as the planning began...
Mark - "Let's go for a talk"
Russ - "You mean I go for a listen"
On their return
Russ - "Mark's done the plan!"
The French were sat on top of a hill that sat over their camp - their allies camp lay behind a couple of water tanks.
Our aim was simple - capture the French and Indian camps. The French aim was simple - stop us doing it.
We started our British plan
Ian - "Do you want to do the orders?"
Me - "No, I want to win".
Ian came up with a daring and brilliant plan - I was to walk the majority of British foot right into the French guns and knock them off the hill while he swanned off on the right wing to capture one of the water tanks (providing cover and protecting his troops) with some sepoys and the native horse.
We also talked about the Sultan Tippoo (of Tippoo's Tiger fame).
Turn 1
I dutifully followed this suicidal order and promptly (with 4 pips) quick-marched down our left flank (a full 18"). In return Mark could only move his cannon and Russ moved his troops sideways.
Turn 2
I move up to 16"of the enemy (if you're going to attack, get in there quick!) - just out of effective range of the cannon. They tried speculative fire and rolled a 6 - so lose one strength. I make the first morale roll of the day - a bleeding 20! One worse so retire shaken and lose a strength point. Good grief.
Mark needed 2 pips to deploy his cannon. He rolled 2 and pointed it at my troops. Git!
Ian meanwhile started rolling 1 for pips and so moved at the pace of a lame snail towards his target - the water tank.
Turn 3
I move up and unshake the shaken unit. As the C in C was with my troops we realised that sending an order was going to be really tough. This would come back to haunt us later.
The French cannon both shot - but no effect. Mark and Russ then started arguing about orders (the sight of the massed British foot going right for the French camp clearly unnerved them).
Russ - "This is the Glorious First of June all over again! You said attack, not hold!"
Mark - "We need to stop Ian getting to the tanks!"
Russ - "No - you need to stop Ian getting to the tanks"
Always good to see the opposition arguing before you've started shooting at them.
Turn 4
We move up again to get within shooty distance. Ian rolls another 1 for a slow move towards the tank. I also move the second line sideways to protect the flank.
The French shoot their cannon and inflict a casualty. I have three morale tests and fail two. So movement is going to be tough next turn. They also move their sepoys in the middle to threaten the British foot and move the light horse to protect the tank. Not that Ian will get there this year...
Turn 5
The British are finally in close contact with the enemy - who get to shoot first. Ian rolls another 1 for pips - it looks like his sepoys are going backwards. Then its trouble at mill as I'm also in cannister range.
Mark "Count the artillery up!)
Russ "Chill, man!"
Basically they add up all the shooting and get a 6 on the dice inflicting a horrific 8 casualties! A rough wooing but strength points off the artillery again.
This is bad news for my boys as Shaken markers means our shooting back will be much reduced.
But my sepoys are also up with the main body and we do an L-shaped move to protect the flank. This proved crucial later.
Mark also gets his horse to the tank first (no surprise really).
Turn 6
We get some shooting in but Russ' Mordor dice saves them.. I then remove Shaken markers to move again - including the sepoys L'shaped formation.
More brutal shooting comes in - 5 hits! I have no idea how but the line is still there and I make some crucial rolls by doing the Russ 3" drop and roll - failing only one morale test! This means I can get some better shooting in.
In the meantime, Ian had finally got more troops around the tank, and some shooty business resulted in Mark's cavalry instantly going Shaken
Mark's sultan is being advised by his pet monkey (but is it good monkey advice or bad monkey advice?). Russ then goes on a wild ride of the Valkyries and unleashes his excellent French cavalry. Ian and myself get a bad feeling about this...
Russ - "Whatever you do, don't roll a 2"
Mark rolls a 2.

Turn 7
I get 5 hits on the French - finally giving them something back from the pounding my line took. Russ then rolls a 20! Retire shaken and the French line breaks up. Ian also knocks the Indian cavalry back on the right as well.
I then create a full battle line (so can share the pain better and get more shots in as a result).
Russ - "Come on Mark! Do something!"
Mark - "He keeps on doing the Minge roll!"
I have no idea what this means.
But the French cannon were kicking great lumps out of my line. I have to take another 6 casualties and 3 lots of Shaken markers. Damn!
We then have a big debate as mark tries to attack Ian's cavalry and finds he has to attack the sepoys instead (as his orders were Attack Left Wing). But his cavalry can't attack the sepoys as they are not allowed to - and so continue to get shot at. Ho ho ho.
Mark "I don't need support!" (yes he does)
Russ "Well I don't want to be pinned by witchery" (meaning Ian's POW trickery)
Mark - "Let's chuck Ian in the pond and see if he floats".
Turn 8
Another 5 hits on my line. No-one can work out how all my stands are still there! Some outrageous morale rolls keeps some really weakened troops in the battle - using the Minge Roll (a 3" wrist roll based on Russ' 1" dice drop).
Russ also attempts some jiggery pokery in front of my British line. But crucially the British line stays in the fight. And the cavalry head round to cause some mischief.
Turn 9
I get some good shooting in and - crucially - kill both French guns! This instantly reduces French firepower. I then angle the sepoys to adjust to the threat of the cavalry. I also manage to move some fresh sepoys up on the French line's flank and suddenly its looking good for us. The French line is broken up but with no cannon they can't get much firepower in. And we have strong units in the rear to push forward.
Ian is also adding his firepower on the right and kills some Indian cavalry AND Mark rolls a 20 for morale!
Turn 10
Our shooting is now on the up and I lob in multiple hits on the 105 table (the boot now being firmly on the other foot). The French cavalry had threatened our infantry at the flank and now moved to threaten the rear. Russ also moved his sepoys to take on the British.
Russ - "Let's see what you can do with 12 inches!" Oooo Matron!
Turn 11
The French line fell back so i can't do much shooting except at the sepoys who have crabbed across in front of the British line. As the French cavalry were now behind me, I couldn't angle my own sepoys and bring more guns to bear. I did move the sepoys on the far left over as well to increase the firepower going in but I also had to turn a couple of units to face off the French cavalry in our rear.
This presented the French with a dilemma. If the French cavalry stayed there, it reduced our ability to take on the French line. But meant that Ian could probably wipe out the Indians (as the seopys were now out of support distance. If the cavalry moved, it would free up the British line but would mean Ian's troops would be in for a very rough time.
We sent an order to Ian's troops (to attack the Indian camp) and this triggered the French to race to order with their own cavalry. As I rolled a 1 this meant the French would get there first. But it now meant that the line was freed up.
I therefore threw out the sepoys on both flanks and moved the line up (as Russ had retired onto the hill) - this meant the French sepoys were now in the firing line. Mark tried to extricate his cavalry as the French cavalry ploughed in. Ian evaded the charge...
Turns 12-15
The battle now dramatically turned in our favour.
I moved my troops into an extended line (mucho firepower). Ian managed to charge the French cavalry in the flank and they evade (pushing them back for the time being).
My 3" Minge Roll saves us again from sepoy shooting (some of these rolls are miraculous as our strength is very low on some units) but my fire back means 5 hits and 2 shakens on the Sepoys. Boom!
Gamey Ian then leaves his evading cavalry off the table - ready to charge back on when the time is right.
Me - "That's why I'm on his side!"
The French sepoys continued to move across but I manged to create a new, even longer, line and bent my sepoys around on the right. This meant a huge amount of firepower coming in and - given the cramped area - the French sepoys couldn't form a line themselves. So they were taking far more damage than they could inflict.
Mark did manage to pin a unit of allied horse but Ian's sepoys shot the pinning cavalry meaning that as the French cavalry charged, our horse could evade off table - taking the French with them! Theere was a rule call that both units could come back but needed pips to do so but again the awesome French cavalry were taken out of the battle - giving the British infantry more time to finish the job.
Russ rolled a 4 and 3 to save his sepoys but they were being whittled down and could not respond in kind.
We were getting increasingly more shots in per turn and the French getting less and less each turn. Once again, the clock beat us but a British win was acknowledged from all sides. The French sepoys had been reduced considerably and the French troops were also in a bad way. The route to the French camp was open. On the right flank, an inconclusive battle was being fought but all agreed that once the French camp had gone, the Indians would have run for it and the field would be ours.
Review
A corking battle. Not the biggest but no worse for that. Helped by chocolate cookies and Ness producing an Indian feast for lunch it was a great day. Ian's 'brave' strategy paid off. My morale checks kept the line intact and killing the two French guns was crucial to winning.
Russ suggested that moving the sepoys sideways was a mistake - he could have used them to threaten our flank instead. In addition, keeping the French cavalry in our rear while the French sepoys moved into position would have created a different outcome (but may have meant Ian killing the Indians and winning the right flank).
A great battle and one we'd like to revisit one day.
To find out more about the Battle of Windiwash, click here.
After the usual chat and banter it was down to business. Wanting to win, I sneaked over to Ian's side of the table (Ian being a POW demi-god) only to find I was actually on the wrong side of the table. It's never dignified to crawl under a table and pop up on the other side, but I think I managed to carry it off.
"So you're going on the British side?"
"No - I'm going on the winning side".
So Ian and me vs. Mark and Russ. We had the British East India Company (with sepoys and native horse contingent) and they were the French East India Company (with their own sepoys and native allies).
We also talked about casualty markers - units on 1p pieces that will mark the progress of the battle. This might work but where static lines converge it might get a bit cluttered.
 |
| Ian informs us where we are fighting the battle. Except he's pointing at Bangladesh. Not southern India. Where it was. |
 |
| Ian doing the pre-battle brief. Something about attacking a laundry (Windy Wash Inc.) |
Mark - "Give us the army list..."
Russ - "I'll let Mark take over - again".
Mark (looking at the army list) - "What is I, S, H"
Me - "Almost shit, but not quite"
Mark "This artillery might as well be a monkey with a slingshot!
Then as the planning began...
Mark - "Let's go for a talk"
Russ - "You mean I go for a listen"
On their return
Russ - "Mark's done the plan!"
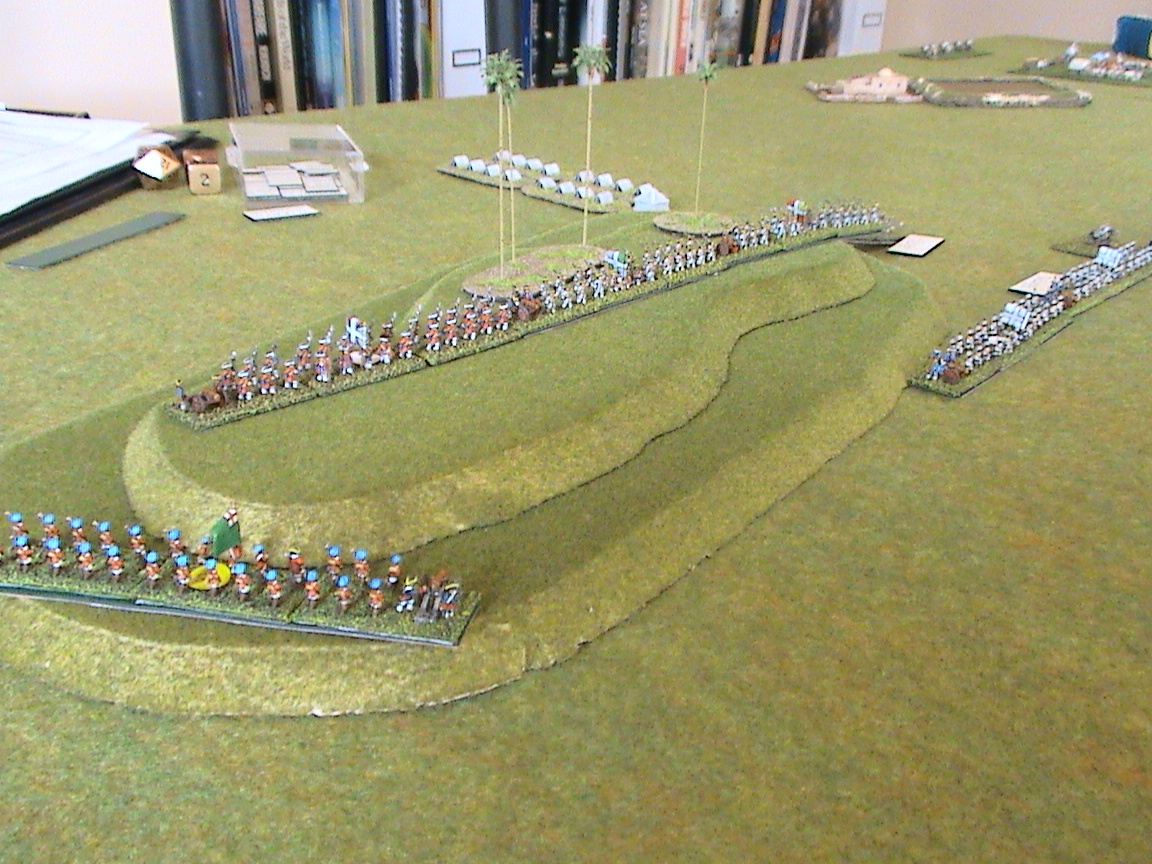
The French were sat on top of a hill that sat over their camp - their allies camp lay behind a couple of water tanks.
 |
| French and Indian camps. |
Our aim was simple - capture the French and Indian camps. The French aim was simple - stop us doing it.
 |
| Russ does the army list as Mark dreams up the grand strategy - for Russ to do what he tells him |
We started our British plan
Ian - "Do you want to do the orders?"
Me - "No, I want to win".
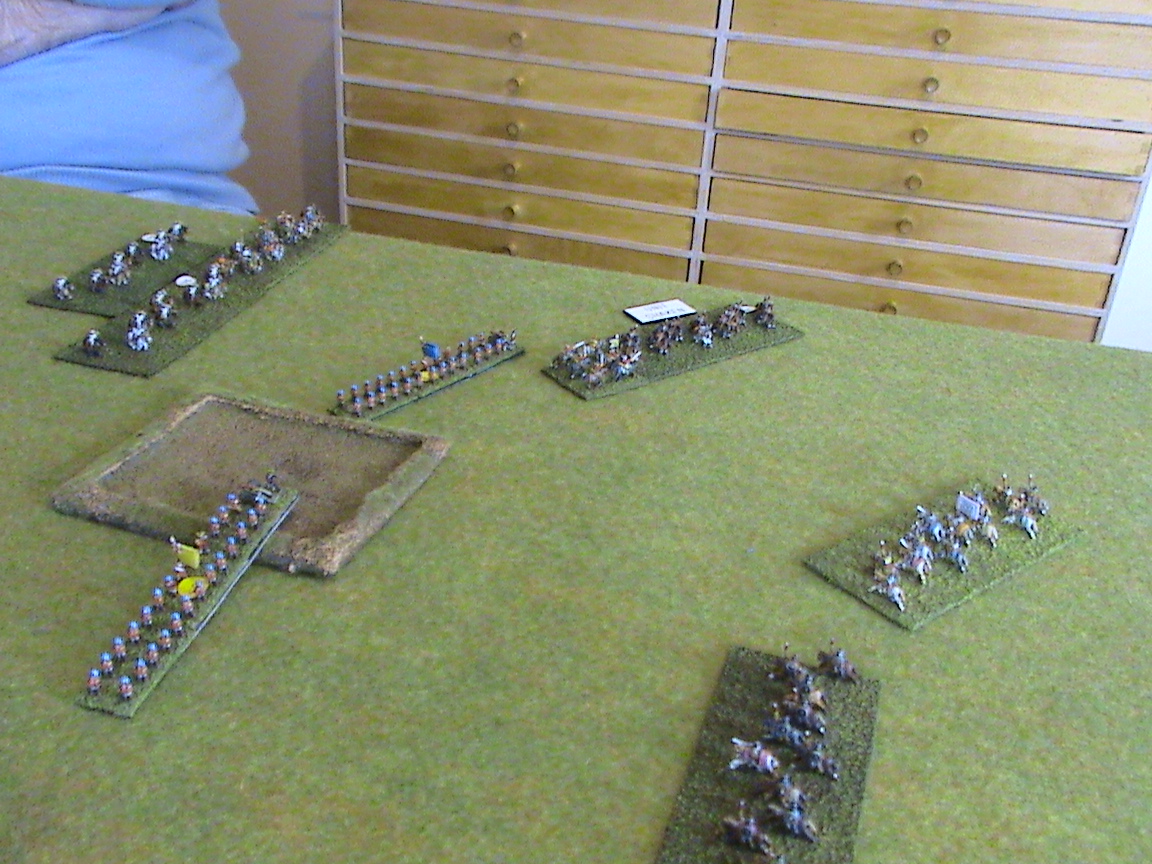
Ian came up with a daring and brilliant plan - I was to walk the majority of British foot right into the French guns and knock them off the hill while he swanned off on the right wing to capture one of the water tanks (providing cover and protecting his troops) with some sepoys and the native horse.
We also talked about the Sultan Tippoo (of Tippoo's Tiger fame).
 |
| Our lovely troops - destined to die bravely. |
I dutifully followed this suicidal order and promptly (with 4 pips) quick-marched down our left flank (a full 18"). In return Mark could only move his cannon and Russ moved his troops sideways.
 |
| Village next to a water tank |
 |
| The British move up. |
Turn 2
I move up to 16"of the enemy (if you're going to attack, get in there quick!) - just out of effective range of the cannon. They tried speculative fire and rolled a 6 - so lose one strength. I make the first morale roll of the day - a bleeding 20! One worse so retire shaken and lose a strength point. Good grief.
 |
| Good shooting by the French. Our line breaks up before we even start. |
Mark needed 2 pips to deploy his cannon. He rolled 2 and pointed it at my troops. Git!
Ian meanwhile started rolling 1 for pips and so moved at the pace of a lame snail towards his target - the water tank.
Turn 3
I move up and unshake the shaken unit. As the C in C was with my troops we realised that sending an order was going to be really tough. This would come back to haunt us later.
The French cannon both shot - but no effect. Mark and Russ then started arguing about orders (the sight of the massed British foot going right for the French camp clearly unnerved them).
Russ - "This is the Glorious First of June all over again! You said attack, not hold!"
Mark - "We need to stop Ian getting to the tanks!"
Russ - "No - you need to stop Ian getting to the tanks"
Always good to see the opposition arguing before you've started shooting at them.
 |
| I get within touching distance of the French. Mark's natives are top right. |
 |
| Ian makes slow progress towards the water tank. |
We move up again to get within shooty distance. Ian rolls another 1 for a slow move towards the tank. I also move the second line sideways to protect the flank.
The French shoot their cannon and inflict a casualty. I have three morale tests and fail two. So movement is going to be tough next turn. They also move their sepoys in the middle to threaten the British foot and move the light horse to protect the tank. Not that Ian will get there this year...
 |
| More good French shooting |
 |
| Mark either casting a spell or trying to fly. |
 |
| The French sepoys move up in the middle. |
Turn 5
The British are finally in close contact with the enemy - who get to shoot first. Ian rolls another 1 for pips - it looks like his sepoys are going backwards. Then its trouble at mill as I'm also in cannister range.
Mark "Count the artillery up!)
Russ "Chill, man!"
Basically they add up all the shooting and get a 6 on the dice inflicting a horrific 8 casualties! A rough wooing but strength points off the artillery again.
This is bad news for my boys as Shaken markers means our shooting back will be much reduced.
But my sepoys are also up with the main body and we do an L-shaped move to protect the flank. This proved crucial later.
 |
| L-shaped sepoys protect the front and flank |
 |
| Mark measuring the distance to Ian's head so he can poke him in the eye. |
 |
| Indians reach the tank first. Sepoys are looking outnumbered! |
Turn 6
We get some shooting in but Russ' Mordor dice saves them.. I then remove Shaken markers to move again - including the sepoys L'shaped formation.
More brutal shooting comes in - 5 hits! I have no idea how but the line is still there and I make some crucial rolls by doing the Russ 3" drop and roll - failing only one morale test! This means I can get some better shooting in.
In the meantime, Ian had finally got more troops around the tank, and some shooty business resulted in Mark's cavalry instantly going Shaken
Mark's sultan is being advised by his pet monkey (but is it good monkey advice or bad monkey advice?). Russ then goes on a wild ride of the Valkyries and unleashes his excellent French cavalry. Ian and myself get a bad feeling about this...
Russ - "Whatever you do, don't roll a 2"
Mark rolls a 2.

 |
| Here come the French cavalry! Oh crap! |
Turn 7
I get 5 hits on the French - finally giving them something back from the pounding my line took. Russ then rolls a 20! Retire shaken and the French line breaks up. Ian also knocks the Indian cavalry back on the right as well.
I then create a full battle line (so can share the pain better and get more shots in as a result).
Russ - "Come on Mark! Do something!"
Mark - "He keeps on doing the Minge roll!"
I have no idea what this means.
 |
| I create a line AND put a hole in the French. Boom! |
We then have a big debate as mark tries to attack Ian's cavalry and finds he has to attack the sepoys instead (as his orders were Attack Left Wing). But his cavalry can't attack the sepoys as they are not allowed to - and so continue to get shot at. Ho ho ho.
 |
| Ian explains why Mark can't attack his cavalry |
 |
| He gets more animated as the explanation continues |
 |
| And finally resorts to using the Red Pencil of Pointyness to explain. |
 |
| "I don't understand..." |
Mark "I don't need support!" (yes he does)
Russ "Well I don't want to be pinned by witchery" (meaning Ian's POW trickery)
Mark - "Let's chuck Ian in the pond and see if he floats".
Turn 8
Another 5 hits on my line. No-one can work out how all my stands are still there! Some outrageous morale rolls keeps some really weakened troops in the battle - using the Minge Roll (a 3" wrist roll based on Russ' 1" dice drop).
Russ also attempts some jiggery pokery in front of my British line. But crucially the British line stays in the fight. And the cavalry head round to cause some mischief.
 |
| French cavalry threatens the flank of the British line. |
Turn 9
I get some good shooting in and - crucially - kill both French guns! This instantly reduces French firepower. I then angle the sepoys to adjust to the threat of the cavalry. I also manage to move some fresh sepoys up on the French line's flank and suddenly its looking good for us. The French line is broken up but with no cannon they can't get much firepower in. And we have strong units in the rear to push forward.
 |
| French line in trouble but we have to adjust to the cavalry |
Ian is also adding his firepower on the right and kills some Indian cavalry AND Mark rolls a 20 for morale!
 |
| LOL! |
 |
| Ian whupping the Indian cavalry |
Our shooting is now on the up and I lob in multiple hits on the 105 table (the boot now being firmly on the other foot). The French cavalry had threatened our infantry at the flank and now moved to threaten the rear. Russ also moved his sepoys to take on the British.
Russ - "Let's see what you can do with 12 inches!" Oooo Matron!
Turn 11
The French line fell back so i can't do much shooting except at the sepoys who have crabbed across in front of the British line. As the French cavalry were now behind me, I couldn't angle my own sepoys and bring more guns to bear. I did move the sepoys on the far left over as well to increase the firepower going in but I also had to turn a couple of units to face off the French cavalry in our rear.
 |
| French sepoys move sideways to protect the line. |
 |
| French cavalry to the rear |
This presented the French with a dilemma. If the French cavalry stayed there, it reduced our ability to take on the French line. But meant that Ian could probably wipe out the Indians (as the seopys were now out of support distance. If the cavalry moved, it would free up the British line but would mean Ian's troops would be in for a very rough time.
We sent an order to Ian's troops (to attack the Indian camp) and this triggered the French to race to order with their own cavalry. As I rolled a 1 this meant the French would get there first. But it now meant that the line was freed up.
I therefore threw out the sepoys on both flanks and moved the line up (as Russ had retired onto the hill) - this meant the French sepoys were now in the firing line. Mark tried to extricate his cavalry as the French cavalry ploughed in. Ian evaded the charge...
 |
| He's smiling now...not for long |
The battle now dramatically turned in our favour.
I moved my troops into an extended line (mucho firepower). Ian managed to charge the French cavalry in the flank and they evade (pushing them back for the time being).
My 3" Minge Roll saves us again from sepoy shooting (some of these rolls are miraculous as our strength is very low on some units) but my fire back means 5 hits and 2 shakens on the Sepoys. Boom!
 |
| The extended line of shootiness |
 |
| French on the hill in a last stand |
Gamey Ian then leaves his evading cavalry off the table - ready to charge back on when the time is right.
Me - "That's why I'm on his side!"
The French sepoys continued to move across but I manged to create a new, even longer, line and bent my sepoys around on the right. This meant a huge amount of firepower coming in and - given the cramped area - the French sepoys couldn't form a line themselves. So they were taking far more damage than they could inflict.
Mark did manage to pin a unit of allied horse but Ian's sepoys shot the pinning cavalry meaning that as the French cavalry charged, our horse could evade off table - taking the French with them! Theere was a rule call that both units could come back but needed pips to do so but again the awesome French cavalry were taken out of the battle - giving the British infantry more time to finish the job.
 |
| French sepoys vs massed firepower and cannister! |
Russ rolled a 4 and 3 to save his sepoys but they were being whittled down and could not respond in kind.
 |
| A wider view - the French have had it! |
 |
| The French cavalry are lured off-table |
We were getting increasingly more shots in per turn and the French getting less and less each turn. Once again, the clock beat us but a British win was acknowledged from all sides. The French sepoys had been reduced considerably and the French troops were also in a bad way. The route to the French camp was open. On the right flank, an inconclusive battle was being fought but all agreed that once the French camp had gone, the Indians would have run for it and the field would be ours.
Review
A corking battle. Not the biggest but no worse for that. Helped by chocolate cookies and Ness producing an Indian feast for lunch it was a great day. Ian's 'brave' strategy paid off. My morale checks kept the line intact and killing the two French guns was crucial to winning.
Russ suggested that moving the sepoys sideways was a mistake - he could have used them to threaten our flank instead. In addition, keeping the French cavalry in our rear while the French sepoys moved into position would have created a different outcome (but may have meant Ian killing the Indians and winning the right flank).
A great battle and one we'd like to revisit one day.
To find out more about the Battle of Windiwash, click here.