Before we started, Ian cracked out some lovely bacon and poached egg baps with coffee to set us up for the day. Yum!
Then up to the gaming room for the set up and picking the teams. I linked up with Mark again (on the basis that we could never throw as bad a set of dice as we did on Thursday) and we decided to play the Prussians (less numerous but better command and control) against Ian and Russ with the Austrians (more numerous but poorer command and control).
Ian had set up another fantastic table - using his Timecast pieces to make a lovely Germanic town and farms setup. On one side was a town flanked by two hills, with open cultivation and a forest (the easier to defend side). On the other were two farms and a hill.
Mark and I got to set up the terrain - we essentially moved the hills round the town closer (in fact, TOO close) and - on the basis that the Austrians had the choice of table side to enter from, we also had to jiggle the terrain on the other side to make another defensive position. We assumed that they would place us on the 'farm' side, so we closed the farms and fields up to make it semi-defensible.
But both armies also had to worry about their lines of supply - randomly diced for, they could end up a long way from where the army wanted to deploy.
 |
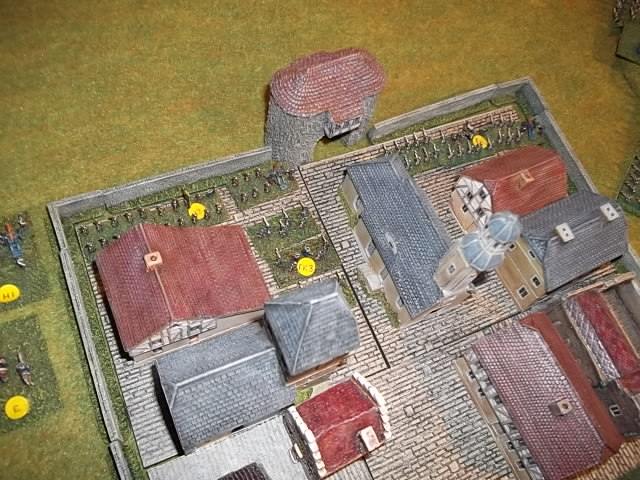
| The town - lynchpin of our defences |
 |
| Hill 2 and the open cultivation. |
Choice of sides
However, they chose the farm side! This allowed us the possibility of creating a hedgehog defence and so a tough nut to crack. But all depended on our line of supply. We diced - and it entered directly behind the town! We could therefore anchor all our troops in or around the town itself. The Austrians were going to struggle to get us out of there.
We set our objective points - ours were on the town and the steep hill to its right (with both farms offering points if we ever left the trenches). Our plan was simple - allow the Austrians to come on, wear them down then spring a cavalry attack around the back to capture a farm while the Austrians were otherwise engaged. Keeping hold of the town and hill and taking one objective would give us the win.
Initial Deployment
POW uses movement bases to both denote troop delpoyments but also allow for dummy placement (to keep the enemy guessing). We placed infantry on both hills and in the town and put one st of cavalry to the right of the steep hill (Hill 2) and another behind the town as a mobile reserve.
We put two dummies behind the hill and town to keep the Austrians guessing (as they were impossible to spot).
 |
| Our movement base deployment |
The Austrians had 5 movement bases on show - 3 down our left flank and 2 on the right.
The Battle
The Austrians spotted our troops on Hill 1 and Hill 2 and we had to deploy them in place. The Centre (C) troops on Hill 2 consisted of some medium artillery and 4 lots of Line Infantry. On Hill 1 was the Reserve (R1) consisting of 5 lots of Fusiliers (which were used to man the hill and garrison the town), 3 lots of Frei Korps (not very good so kept out of the way for now) and the Grenadiers (tough cookies!).
 |
| Prussians on Hill 2 |
 |
| Troops in the town and Hill 1 |
Luckily they failed to spot our Cavalry on the right (RC) which say between Hill 2 and the wood.
As the Prussian troops were unveiled we found that the hills were essentially impassable to cavalry or artillery and slow going for foot soldiers. This meant that the Austrian cavalry would be unable to attack either hill. The cannon on the hill was allowed (it was assumed we'd winched it up there) but it could not move from its position - which was pointing at the area in front of the town.
Our cannons shot at the left flank and caused a morale check - easily passed.
More movement and spotting discovered the massed cavalry behind Hill 3 as well as the C in C (who had been moving independently - a sneaky move by Ian).
 |
| Grenzers on Hill 3 - with cavalry behind |
As the movement base on our left was getting closer we opened up with the cannon again - causing 2 casualties and forcing 2 cohesion tests (passed with a 3 and an 8!). Russ was carrying on where he'd left off on Thursday!
The Austrians still hadn't spotted our cavalry by the woods.but all the Austrians were now revealed. A huge wodge of them were coming down our left - Hill 1 was obviously there key target. Behind them another huge block of cavalry.
 |
| The Austrian RI and RC bear down on the town and Hill 1 |
As a consequence, we angled our forces on Hill 2 to face this threat - but found that we had not left a big enough gap for a line of troops to get through. This would hamper our ability to flank them should they get near as it would block off our medium artillery).
 |
| The gap between the town and Hill 2 - too narrow for a line to get through |
On the left we faced 9 units of Austrian Line Infantry (E), a medium cannon and a mixed force of Cuirassiers, Dragoons and Hussars. Lordy!
We hoped that the hill, cannons and walls would somehow preserve us from this overwhelming force. the cannons shot again and hit a unit of Line Infantry but also managed to hit and wound their general (-1 on all rolls!). Cheers from the gun crew.
The Austrians finally spotted our cavalry - who stayed still with a view to holding the right flank.
The wounded commander was making heavy weather of moving his troops as was now a key target priority for the cannons. We opened up again - and not only inflicted 2 more casualties but hit the general again! He disappeared in a red mist as a cannonball chopped him in half. The Austrians were left stranded as the C in C searched his command for a suitable replacement and chose General Krapp who rushed up to take his place at the front of Group E.
Seeing the threat, we piled more troops into the town (better protected from gunfire) and occupied more of the hill to bring more musketry to bear. We also lined up our Right Cavalry by the wood to be ready to move / attack.
 |
| Prussian troops garrison the town |
 |
| Look at them Austrians coming on! |
 |
| The view from Hill 2 |
The Austrians ordered their RC to move - the infantry were stuck in front of the town as the new commander made his way over - he proved to live up to his name (a Poor commander with d4 for pips).
As the troops were stuck we opened up again - with me using my special dice (renamed The General Killer) but only caused 1 casualty on unit 23. We angled some of the troops on Hill 2 to provide more shooting power on the sides - the Austrians were entering a killing zone.
General Krapp at least got the troops moving again - as the cavalry behind them moved sideways towards the centre (we thought to take on our cavalry).
But they were now within 4" - musket range. Every Prussian who could shoot opened up (together with cannister from the cannons) and inflicted a whopping 7 casualties. Russ had some excellent morale rolls though and only one unit was Shaken - not good for us. We thought the worst was going to happen and the Austrians would close to our troops in just another turn.
We also moved the Grenadiers up to get some shooting into the Austrian flank.
The Austrians shot back - 4 casualties (ouch) and Russ threw a 4 on a d4 for pips and then informed us of his intention to attack the hill (thanks for the heads up!). So we knew - as suspected - where the attack would come. But this meant that his troops would have to run the gauntlet for a turn or two as a result.
Their cavalry then charged one of the units we'd moved off the hill. We were lucky that they passed a morale check but they still took casualties and retired Shaken (luckily back on the hill where the horses couldn't get them).
 |
| Cavalry charge into our infantry! |
Prussian shooting was devastating again - another 7 hits. But Russ' d20 was on fire and again only 1 Shaken resulted (from 6 tests). Grrrrr!
But - we managed to wound General Krapp (-1 on all rolls) and ordered the LC cavalry to attack the flank of E (as their cavalry had moved centrally).
Austrian shooting was less effective and we took a couple of casualties but no Shakens.
Now the wound started to bite. Krapp couldn't seem to get his troops to move or remove Shaken markers - as all rolls were reduced by 1 and he was only using a d4 for pips. The Austrians had moved their own Grenadiers to cover their right flank but they'd been detached from the battle line (so needed 2 pips to move or remove markers). 1 pip was not enough for either so they began to degrade from here on in.
 |
| The Austrian Grenadiers are stuck |
Meanwhile, Russ issued another order to the cavalry (the 4th so far) prompting us to suggest that his Cavalry Commander would have replied "Can you number these orders? I'm losing track of which one I'm supposed to be following".
Before they could move though, another volley of fire from the Prussians - and another 7 casualties (that's 23 or so to date, if you're counting). We were rapidly degrading their front troops (but this meant that their troops behind would be fresh should the lines clash.
Movement was limited - we were in good shape and all guns that could were brought to bear.
Worse for the Austrians, General Krapp continued to produce limited pips - so much so that we instructed our troops to shoot around the General as he was doing such a good job for us.
Austrian shooting was getting ragged and ineffective (1-2 casualties per turn). However their cavalry moved to threaten ours by the wood.
Our shooting though saw another 7 hits in (around 30 casualties so far) and as a consequence, morale tests were being missed - not helped when Russ rolled his first 20 and the unit retired Shaken and thus caused the unit behind to become Shaken as well. The Austrian line was beginning to break up.
We decided to unveil the cavalry on our left - who promptly got 1 pip and couldn't move. D'oh.
 |
| Good shooting! |
General Krapp failed to move his troops at all so the C in C had to move up and take command of the Austrian grenadiers and placed them to block our LC cavalry. Grrr!
Finally Russ also ordered the troops off Hill 3 - they had been conspicuous by their absence (not that we were complaining!). The plan seemed to be that their advance would be screened by the RC cavalry - preventing ours from taking on the footsoldiers. But was it all too late? The Grenzers immediately contacted the hill and found it to be slow going - they moved at 2" for a couple of turns as a result.
As Krapp's troops couldn't move, we shot them again (another 7 hits!) prompting a change of order to bring his fresher troops to the front. As Ian observed "There are plenty of gaps to move through".
Austrian shooting inflicted just 1 casualty on us. But their cavalry bore down on our RC cavalry by the woods (the intention obviously to clear the area behind Hill 2 and so get into our rear) and the Grenzers continued their slow advance.
Prussian shooting inflicted only 5 casualties (as the troops in front of them were disappearing) and 2 units of Austrians routed as a result (so any morale checks were now at -2). We then realised that we had a chance to kill General Krapp (a 4, 5 or 6 would do the deed). But killing him could see him replaced with a better quality commander and without the -1. I rolled and never has a 1 been so joyously celebrated. Krapp lived to 'fight' another day. I bet his troops were disgusted.
Now it all got tasty!
We moved our LC Cavalry into position to support a charge on the isolated Grenadiers - while the Austrian RC aimed to take on our RC cavalry by the woods.
Two units of cavalry moved in - but one bounced and we got hits on the other and both went Shaken - a good start for us.
 |
| The opposing generals consider their next move. |
Austrian shooting was now supported by the cannon (as their troops retired) and 3 hits were taken as a result. Worse, our LC cavalry got shot at and bounced from the Grenadiers. They started trying to move troops to attack Hill 1 but Krapp kept them stuck in front of the town and more hits were inflicted.
 |
| Stuck in front of the town thanks to General Krapp |
Russ and Ian justifiably stated that the Austrian infantry had been under fire for several turns and were still there - but that was mainly as we were shooting at long range. If we could move closer, we could get devastating close shooting in and sweep the remaining Austrian RI from the table. It was looking like a race against time.
Mark chose this point to leave (he had to go at 4pm) leaving me to fight on alone.
The cavalry battle continued - with hits and morale failures on both sides. I couldn't kill off his lighter cavalry in the open fields (being hampered by terrain and being Shaken) but my other units fared well againt their Austrain counterparts. In addition, a unit of infantry on Hill 2 managed to inflict casualties on another unit of Hussars and forced them to go Shaken. The longer the cavalry held out, the more chance of clearing the left flank and coming to help the troops on Hill 2 (who could see the Grenzers and artillery coming their way).
 |
| Shooting from the hill into the cavalry |
 |
| Looking good for Prussia |
 |
| The cavalry hold on against the odds. |
On the left, our Grenadiers charged their opposite numbers (who were Shaken) and pushed them back behind an already battered Line Infantry unit. This opened up a gap for the LC cavalry to line up this battered unit themselves.
This precluded the movement off Hill 1 by the remaining units (mainly Fusiliers and Frei Korps) to engage the remaining infantry in front of them. We were also planning to rush from the town and clear the troops in front of them (as only 2 units now had any strength left - the rest were down to 2's and 3's.).
 |
| The battered Austrians on our left flank |
The LC Cavalry impacted on the battered Austrians who amazingly passed a morale check and stood to receive the charge! The outcome was not in doubt - not helped by the dice tower delivering 3 6's on the trot (a massive turnaround from Thursday). The cavalry routed the battered ones - and followed through into the Grenadiers and routed them as well. This meant that all remaining morale checks for Krapps forces would be at -4, and most had only 3 strength to start with. A concerted effort would see them swept away in short order (even the relatively unscathed units would find it hard to pass morale tests in such a situation).
 |
| A unit of LC cavalry sweep away a unit of Line and unit of Grenadiers in one move! |
In the middle, the Prussian cavalry continued to hold their own as the Grenzers moved up. Some artillery shooting was taken on Hill 2 but was ineffective.
We decided to stop proceedings there. There was still a lot of fighting left but we'd been done for time. A shame, as the battle was finely poised. The left flank was ours, but the Austrians still had a considerable untouched horse and infantry force in play. The cavalry in the centre seemed destined to cancel each other out. The infantry on Hill 2 were strong, untouched and in a good position (it would take the opposition 2-3 turns to get to grips - by which time a force from the left could have helped relieve them (the LC cavalry hopefully masking them from the opposition cavalry).
So in terms of infantry we had the upper hand and the cavalry slightly in Austria's favour. But by breaking the back of the LI in front of the town, we now had 13 infantry units in good order (two had taken 4 casualties but the rest were generally OK) while the Austrians had just 7 in good order - 2 of which would be fighting on -4 on morale (or worse if their weakened bretheren were routed). So it was likely that 10-12 Prussian units would face 5 Austrian.
 |
| The left flank - the Prussians press forward. |
Review
A great battle - with mistakes on both sides. At least Mark and I got some decent dice throwing going (another Thursday-like performance and I've jacked it all in!). and we were lucky in a number of respects.
Getting to defend the town and Hill 2 made it much easier for us (it was certainly easier terrain to defend than the farmland on the other side.
Having the Line Of Supply right behind the town was a real bonus - this meant we were not strung out all over the line but keep tight to the town.
Our cavalry surviving the concerted cavalry charge preserved our flank and rear - and so secured our position.
We think the Austrians should have moved their Grenzers and Rear cavalry much earlier - we were given free rein to take out their right flank almost unhindered (except for a brief cavalry charge).
And of course General Krapp keeping his own troops pinned down in front of the town (and taking 40 odd casualties from shooting) made our task much easier! He should be given the Prussian Black Eagle!
It could have gone much worse for us - the Line Infantry could have contacted our town and Hill1 much earlier (but would also have faced close range shooting and hence more casualties).
But overall a great battle and another good day at Ian's house.