The rules were POW Renaissance with some additional house rules.
Historical background
The Battle of Edgehill (or Edge Hill) was the first pitched battle of the First English Civil War. It was fought near Edge Hill and Kineton in southern Warwickshire on Sunday, 23 October 1642.
All attempts at constitutional compromise between King Charles and Parliament broke down early in 1642. Both King and Parliament raised large armies to gain their way by force of arms. In October, at his temporary base near Shrewsbury, King Charles decided to march on London in order to force a decisive confrontation with Parliament's main army, commanded by the Earl of Essex.
Late on 22 October, both armies unexpectedly found the enemy to be close by. The next day, the Royalist army descended from Edge Hill to force battle. After the Parliamentary artillery opened a cannonade, the Royalists attacked. Both armies consisted mostly of inexperienced and sometimes ill-equipped troops. Many men from both sides fled or fell out to loot enemy baggage, and neither army was able to gain a decisive advantage.
After the battle, King Charles resumed his march on London, but was not strong enough to overcome the defending militia before Essex's army could reinforce them. The inconclusive result of the Battle of Edgehill prevented either faction gaining a quick victory in the war, which eventually lasted four years.
Set-up
Russ chose to take the side of Parliament so I plumped for the dashing Royalists (better outfiits to be fair) and set up in front of the hill, with King's Ley Barn on my right. There were enclosures on both sides of the battlefield (not good for cavalry nor infantry) and some ploughed fields in the middle of the battlefield (behind which the bulk of the Parliamentarians (P's from now on) army sat.
 |
| The dashing Prince Rupert and his cavalry on my right flank - defending (not for long though) the King's children who are observing from King's Ley Barn (apparently). |
 |
| The rest of the Royalist forces - another batch of cavalry on dragoons on the far left, with infantry and cannons in the middle. Edge Hill is behind them. |
 |
| The view from my rear - you can see most of Parliament's forces here - except for the cavalry / dragoons to my left. |
 |
| Fantastic scenery really sets up the battle. |
My Plan
I expected Russ to trundle his superior numbers of infantry forward so my plan was relatively simple. Rush the cavalry down both flanks to crush his cavalry then swing around the rear. Once the flanks were clear, they would ride in behind the gap created by Russ moving forward and hit them in the rear (hopefully my infantry would still be in place to provide an anvil for this hammer to hit against.
And so it begins
I opened fire with my cannons and missed everything! This was merely to distract the P's from the dashing charges down both flanks of my curassiers and dragoons (with Rupert on the right and Lord Wilmott on the left). Sir Jacob Astley held the forces steady in the centre to await the expected P advance.
The P replied and his artillery got some great shooting in (shaking 3 of my units!) and moving his curassiers and dragoons to head off Wilmott on the left.
 |
| Rupert bombs down the right. His dragoons aim to take on the muskets in the enclosures while his curassiers are itching to have a crack at the mixed cavalry and shot in front of them. |
Wilmot charged in on the left to hit the combined currassiers and dragoons (who shot at the troops charging them but missed) while Rupert similarly hit the curassiers on the right. Wilmot got some big licks in and beat back the cavalry facing them. The P dragoons routed as well and a unit of curassiers pursued them - a good start for the King!
Rupert found it tougher going on his flank but still managed to punch a hole and created a big headache for Lord Essex.
 |
| The P cavalry dissolve in front of Wilmott (as his dragoons sneak around in the hedgerows to get some flanking action in). The P dragoons can be seen running away in the background. |
 |
| Rupert finds it tougher going on his flank - but still inflicts some hefty damage. |
Russ wasn't playing ball here. His infantry stood still in their excellent defensive posision (curses!) so we continued to simply trade cannon shot and insults. His light artillery however was turned to track the R cavalry - and his flanking infantry also pivoted to face the potential threat.
My shooting achieved nothing so we moved swiftly on to the stabbing. Rupert continued to wear down the opposition on the right, while Wilmott followed up his initial success by killing the P dragoons and routing more P's (for the loss of a curassier base). He then aimed to surround the P general and kill him off.
 |
| Ian explains to Russ the reason his cavalry is dying in droves. "They're rubbish". |
On Rupert's side everyone who could get stuck in did - including the dragoons charging the hedgerow musketeers.
 |
| Absolute bedlam as everyone gets stuck in. |
Russ' flanks were looking shaky - although his generals on both sides were staying in the fight. However, Russ pretty much abandoned his right flank as a lost cause and decided to send Essex over to bolster his left wing (where they were faring better). However, my dragoons routed one unit of muskets and shook another and looked on for an uncontested rush round the outside.
Russ got some more good shooting in (at one stage he seemed incapable of throwing anything but 6's!) and his cannons continued to inflict damage on my ranks.
My dragoons on the right completed the job of clearing the hedgerows and now had the opportunity to join the fun to their left. Rupert meanwhile was trying hos best to kill the opposing general - who retired backwards. In their haste a unit of R curassiers pursued and ran into the P reserves who killed them off (Russ throwing ANOTHER 6! - grrrrr.). But his general died in the same combat. King Charles is looking safe.
 |
| Wilmot's troops surround the P's general who goes Shaken. Just die, will you! |
 |
| Rupert's troops kill more P's and aim to kill the general as well. |
This good news was soon added to as the P general on the left routed (heading off for the Midlands with a cry of "I've left the gas on...I'll come back later, honest lads!"
So the left flank was clear and the right was looking good for the R's. Time for a break which involved steak pies, a nice bottled lager and a chocolate muffin.
Clearly the beer had affected Russ as he tried to roll a d10 for pips!
Back to the action. It was looking ropey for the P's so Russ chose to kill off Rupert and change his troop dispositions to better protect his flanks. Rupert - against all the odds - hung in there and managed to shake his opponents into the bargain.
I therefore (with some terrible rolling for pips from now until the end of the battle) managed to support him - but not achieve much more than that.
My shooting again didn't account for much - but it didn't matter as in the melee I managed to get Essex surrounded and killed him with a 6!
Rupert's unit dropped to 1 strength and so was most fragile so I wanted to move him away from any threat.
 |
| Russ forms a defensive ring in respose to his flanks collapsing |
My shooting hadn't achieved much but there's always a chance. My heavy cannon shot at one of his pike units and the morale throw was a 20! They therefore fell back into the troops behind them and both went shaken.
 |
| Heh heh - good shooting, lads! |
Alas, like Nelson at Trafalgar, Rupert died at the moment of triumph. Having achived more than I expected (not just clearing the flanks but taking out 2 generals - including their C in C) he was ignobly shot in the back by a light cannon and some musketry.
I had already issued the order to move my infantry forward and now it was recieved - good timing by the cannon crew! The massed R pikes surged forward. I also reformed my cavalry on both flanks to be in better order to damage the opposition. |
| Astley picks his moment and sends the Royalist infantry forward as the enemy are facing in three directions and some are Shaken to boot. |
Now it all became fast and furious (so much so that I forgot to dring the coffee Ian had prepared!). The P cannon started inflicting damage on my pikes as they trundled forward and Russ also sent an order to reform the infantry. Meanwhile Wilmot was getting into a position to get around the back of the P's (as I'd originally ordered) while Rupert's replacement was mopping up on the flanks with a view to executing a similar move.
 |
| My right wing - all opposition neutralised. The dragoons can now come out of the hedgerow. |
 |
| Wimott gets ready to charge into the rear of the P pikes |
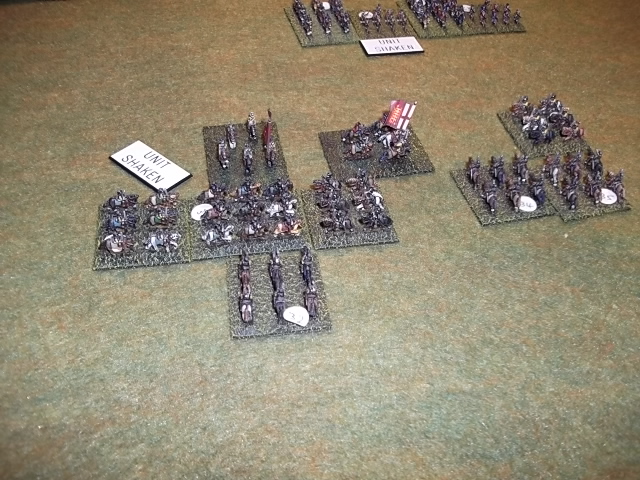
On the flanks, my flanking infantry charged both light guns - forcing their crews to run away (and meaning they couldn't add their firepower to any scrap. This meant that the two flanking P pikes had to turn again or face being charged by the R pike in the flank (but also exposing them to potential cavalry attacks. However, my infantry were armed with battalion guns and could now open up down the line - which they did. This caused Russ' right flank to go Shaken. At the same time I charged the screening unit of pike with dargoons and curassiers and forced them to go back Shaken as well. Russ's right flank was looking very ropey!
 |
| Two units of pike go Shaken - time to charge! |
Ian warned me that it was getting dark (both outside and in 'game time') meaning a result had to be eked out fairly soon. I therefore resolved to attack what I could to force a result.
My shooting took down both heavy cannon - meaning that the way was clear to simply shoot the P pike with battalion guns and musketry and hammer to P pike until they had to come and fight. I intended to just wear them down and som make any melee a formality.
Russ charged my rightmost pikes with a unit of his - which I shot at on the way in and as a result held my own (luckily) - at this stage that was enough.
Of more concern for Russ was his own right flank (my left). Ian judged that my dragoons would charge the nearest unit - which happened to be Russ' right flank troops that were already shaken. I therefore charged them in the rear with my dragoons and any other cavalry that could reach (including Wilmot himself). At the same time I charged in my pike facing them - creating a P sandwich!
 |
| A unit of P pike surrounded and due for annihilation! |
In the melee the P pike was crushed and retired Shaken but as they had nowhere to go they were adjudged to have surrendered. At this point the battle was effectively won. There was little to stop the R rolling up the flank of the P front line (which were due to undertake withering fire from the R infantry facing them). The P had no artillery left, no cavalry left and their flanks were crumbling.
Russ therefore conceded defeat.
King Charles could now proceed to London - mourning the loss of Prince Rupert but celebrating both the defeat of his enemy and the death of Lord Essex. The Civil War was as good as over.
Review
Ian informed us that the real battle followed in a similar manner. The R dragoons managed to quickly sweep the opposition dragoons and muskets from the flanks - then Rupert charged in to sweep the opposition cavalry away. Wilmot charged at about the same time but (crucially) his troops simply rode to Kinerton to raid the baggage train. Mine stayed to fight!
The P infantry pretty much stayed where Russ had them - waiting for the R infantry to come and get them (as mine had to). In the real battle many P troops ran away when they saw their cavary defeated and when the R pikes got too close (Russ would never allow such callow behaviour!). Some P cavalry were however sat behind their own pikes and emerged to take on the R pikes - unopposed by R cavalry which were occupied elsewhere. This forced many R to flee and therefore balanced up the opposing forces.
As a consequence some of the P infantry managed to overun the R artillery and even captured the Royal Standard! Charles had no reserve (neither did I!) and so attempted to rally his own troops. The Standard was re-captured by some returning R cavalry.
Essex then broke off the battle for the day - and both sides refused battle the following day. An honourable draw.
I was pleased with the outcome. I was suprised that Russ didn't come out fighting with his superior infantry but then I'd have done the same as he had - stay inside a defensible position! I was lucky that he combined his dragoons and curassiers on my left - that initial charge and melee meant that the left flank was pretty much open from the start. The right wing faced a more numerous opposition and I was very happy to get through that lot relatively unscathed.
In the centre, Russ' cannons did a lot of damage to the troops as they got close - but then my battallion guns evened up the score. I was lucky with many dice rolls (my dice tower has repaid the effort put into its construction) but at one stage I was convinced Russ was using a dice with a 6 on every face!
The battle plan therefore was quite effective. I moved my infantry just at the right time and knocking off three commanders (including Essex) curtailed Russ' movement at crucial stages.

I'm also very much enjoying the Renaissance period. Ian's promising some great battles later in the year - including an exciting French vs British campaign in India (including elephant-mounted guns, sepoys and - no doubt - exploding suicide monkeys and catapults shooting man-eating tigers!). Looking at the superb Heroics and Ros figures I'm getting sorely tempted to get some - but realisitcally I've still got a load of unfinished Napoleonics to paint and base, so I'll have to put that on the back burner for now.
Ian's done a superb job on his 6mm though and on the field, they look great.
So - a very enjoyable day. Thanks to Ian for his hospitality and Russ for his company and for a great battle.
Next week? Field of Glory : Macedonians vs Indians! Just need to think of a scenario now...